|
By Katriel So many photographs are taken on nice, sunny days. It’s rare to see a picture shot outside during inclement weather but pictures taken during a rainstorm or other bad weather can add interest and mood to a photograph. I understand that people may shy away from taking pictures when it is snowing or raining in order to avoid damaging their camera or lens. So to protect myself from lawsuits and because I sincerely mean it I say to you: follow your camera’s manufacturer’s advice. This article is about my experience and is not a tutorial. I repeat. Follow the guidelines of your camera and lens manufacturer(s). This article is for entertainment purposes only. Did you know that you can buy a weatherproof point-and-shoot camera for under $200? I once owned a weather-proof, wide-angle, point-and-shoot, film camera. The camera’s housing was built to withstand rain, snow and shallow dips into an ocean or a pool. Available are more expensive cameras that can withstand the pressure of let’s say a scuba dive of 100 feet or more. Special cases can also be purchased to fit the camera you already have and you can buy what’s called a rainsleeve: a clear plastic that covers the camera and lens, and keeps your hands dry. Rainsleeves can be bought for under $30. But what do you do when you’re out for a walk and a soft, misty rain starts falling and you want to capture the raindrops but the camera you have with you is not weatherproof and you don’t have a rainsleeve? What this photographer has done is… Please follow your camera manufacturer’s guidelines instead. (And I may repeat this a few more times.) What I have done has depended on what else I was carrying. In the case of an umbrella, I’ve placed the camera within the umbrella’s range and shot one-handed. When I didn’t have an umbrella but had a purse, a piece of paper or a book then I placed these items over the camera if they were big enough to protect the camera and lens from the rain or snowfall. You may wonder what have I done when I had nothing that could act as a protective covering and the manufacturer explicitly stated in the owner’s manual not to get the lens wet? Truthfully, when taking pictures for myself I am more cautious and am less likely to operate my camera in bad weather without protecting it but I have done it. And I have definitely done so for a couple of clients because deadlines must be met. So far, I have not caused any damage to any lens or camera. Even when I was shooting for a client, however, I’ve only continued shooting in the rain or snow when the precipitation was no more than a drizzle. The result was pleasant. The image had a romantic feel to it.
0 Comments
If you’ve ever wondered what you need to bring with you for certain types of photography below is a list with the whys and therefores.
Travel Photography Equipment List a. For low light or night time i. Tripod – to keep camera steady when using a shutter speed below 1/60 of second when avoiding the use of a flash. Also, so you can use the self-timer on your camera and put yourself in the photograph ii. Lens – that can widen to an aperture of at least 2.0 –This will allow you to record more available light than a camera with a lens that cannot open that wide. So if you don’t like using flashes using a lens with a lens speed of f/2.0 or faster may delay the need for a flash iii. White card to record correct color temperature in mixed lighting situations iv. External hot shoe flash – For indoor use to brighten a dimly lit room v. Colored Gel filters – To tint the light emitting from a flash so it matches the ambient light in the room vi. RECOMMENDED CAMERA: a camera that can be mounted onto a tripod, allows the recording of custom white balances and the use of an external hot shoe flash b. For capturing architecture and monuments i. Wide angle lens (a lens with a lens focal length of 10mm to 24mm) – in order to increase the chances of capturing the breadth and/or height of a building or monument in one shot. Otherwise you may have to shoot several slightly overlapping shots of the structure and stitch them together in an image editing software that has that capability. ii. Image editing software – that can stitch photographs together to create a panorama; software that allows you to combine two or more images into one. iii. RECOMMENDED CAMERA: one that allows for the use of a wide angle lens; and has auto exposure bracketing as a function to help create high dynamic range images. (See previous’ issues post to see why you may need to shoot more than one exposure of the same scene.) c. Candid portraiture i. Lens – When you’re travelling you may want some distance between you and the people you’re shooting, if they are strangers. On a 35mm film camera or a digital camera with a full-frame sensor a medium telephoto zoom lens with a range that includes 75mm to 200mm. should do. Remember that if your digital camera’s sensor is less than full frame the lens you use should account for the camera’s lens crop factor. For a good explanation of crop factor please read this article http://digital-photography-school.com/blog/crop-factor-explained/ by Darren Rowse. 2. Studio or Formal Portrait Equipment List a. Individual or groups i. Backdrop - which should be either uniform in color or textured but not clash with the clothes of the people you’re shooting. ii. Studio light for one individual– a common way to light up an individual for a formal portrait is to use a 3-point lighting set up: a main light brightens 3/4 of the face, a second, less powerful light source lightens the other side of the face to reduce shadows; a third light is used to brighten the hair or remove shadows on a background caused by the first two lights. This mode of lighting aids in making the portrait more three-dimensional. However, two lights are one may be used for a more dramatic effect. iii. Studio light for two or more people – If shooting indoors be prepared to use at least a four-light set up for groups – two lights overhead and one from each side, plus lights at the front shining up from the floor if the goal is even lighting. Composition-wise you may want to avoid placing groups in straight rows in order to achieve a more dynamic feel. If using continuous lighting they should have variable power for controlling light output iv. Soft box – to achieve diffused lighting; diminish the appearance of wrinkles. Soft boxes often are used fill lights. v. Reflectors – an alternative to using soft box. vi. Tripod – to avoid camera shake. vii. Cable Release – helps reduce camera shake viii. RECOMMENDED CAMERA – a Large format, medium format, dSLR that can record at least 8 megapixels (the more pixels the larger print you should be able to make in theory), or 35mm camera will do. The difference between them depends on the largest print you intend to make. 3. Event/Wedding a. The ceremony and reception i. Flash with a fast recovery time so that you don’t miss a shot ii. 50 mm lens that can open to an f/stop of 1.4. This will help you record more ambient light in low-light situations and it’s also very easy with a 1.4 aperture to take a picture that blurs the background which lets your subject stand out. iii. Wide-angle lens to capture a location shot of church or banquet hall if the size of these venues is immense iv. External, hot-shoe flash with a high guide number. The higher the guide number the more powerful the flash in terms of the distance it can project the light. When shooting a banquet hall you’ll want a light that can light up as much of the room as possible. You’ll also want to be able to rotate the flash so you can use the bounce technique which will place a more diffused light on your subject. v. Colored gel filter to adapt the color temperature of the flash to the room. The combination of bouncing a flash that has a colored gel filter that matches the room can result in a picture that looks like a flash was not used. vi. RECOMMENDED CAMERA – dSLR or 35mm camera for portability and versatility b. Candid shots – Unlike travel photography the candid shots you take in a wedding will be of people who are known to the groom or bride and expect to have their photographs taken, therefore, a lens with a shorter focal length will do. i. Lens – 50mm with an aperture that can go as wide as f/1.4 ii. External flash which can be swiveled away from guests faces to avoid the harshness of direct light; a flash whose intensity can be reduced since the distance between you and your subject will be short. iii. Gel filter on flash that matches the color temperature of the room. iv. RECOMMENDED CAMERA – dSLR or 35mm camera for portability and versatility c. Formal Portraits indoors at the wedding or reception. i. Backdrop – portable backdrop unit and lighting kit. ii. Lighting – the lighting should be very portable. Brining flashes that can act as slaves (be triggered by a master flash) will reduce the weight of everything you’re bringing. iii. Long grounded electric cord – to connect the lights to electrical outlets or buy lights that are battery powered. iv. Duct tape – often something will try to fall or tear. Duct tape can be a miraculous savior. v. Clamps – to secure the backdrop to the backdrop posts. It helps keep cloth backdrops taught and reduce wrinkles. vi. Portable steamer to steam out wrinkles on a cloth backdrop (rarely do wedding photographers bring a steam with them, but a crisp backdrop can reduce editing time.) vii. Soft box – to achieve diffused lighting; diminish the appearance of wrinkles. Soft boxes often are used fill lights. viii. Reflectors – an alternative to using soft box. ix. Tripod – to avoid camera shake. x. Cable Release – helps reduce camera shake xi. Printer – if you’ll be selling prints at the wedding bring a printer optimized for photography and plenty of back-up ink, paper, and cardboard photo frames, and a stamp with your business name and contact info to press onto the back of the photos in case someone want to contact you for more copies of the photos. xii. RECOMMENDED CAMERA – dSLR, 35mm film, or medium format camera. d. Formal portraits outside i. The solo photographer – if you’re by yourself doing the shoot you only need dSLR or 35mm camera with an external flash to help freeze action and movement of clothes and flowers on a windy day. ii. The photographer with assistant(s) – you may want to also have with you a larger reflector to make sure everyone in a group shot is lit well. One very important accessory not mentioned is the battery. The constant use of flash at events such as weddings drains batteries very quickly. Make sure you have two more sets of fresh batteries than you think you’ll need. For the camera body you may want to consider investing in a battery grip which allows you to shoot with the power of two batteries at the same. That way you don’t have to stop as often in the middle of a shoot to swap batteries. These tips come from recommendations by other photographers, other experts, and my own experience. Some of the tips haven’t always worked for me. Others have. I let you know what went right for me and what didn’t.
1. No perfume. Shooting animals or bees? Leave the perfume bottle on the dresser unless you want a too-real close-up shot. (The no-perfume recommendation comes from the guidelines provided by the great staff at Wolf Park, in Indiana; and from having been the focus of an actual bee-line. I wasn’t shooting the bees heading straight towards me at the time. I suppose that was a good thing. It allowed me to duck.) 2. Camouflage – Whether you’re exploring the woods at the edge of your backyard or those at a forest preserve or park clothes that blend with your surrounding is often recommended as a way to avoid detection by your prey. That’s assuming your prey isn’t smarter than you. For instance one beautiful wintry day I wore all white with the intent of shooting a flock of geese in the park. There were about thirty gees eating snow. When I arrived I was facing their rear ends. I decided to every so-slowly circle around to shoot them from the side so I could include faces in the shot. And I was very slow. It took me about seven minutes to walk a 90 degree arc. I stopped not because I had arrived at my intended destination but because I realized I was still facing their rear ends. Through all this time all thirty-or-so birds had maintained their back-end to me ready for flight while munching snow. I probably should have just run into their midst and sent them scurrying into the sky. I probably would have obtained some great shots of scared geese that way. Oh well. 3. Camera supports. Sturdy tripods are a wonderful thing. They keep cameras steady during strong winds; allow for slow shutter speeds when capturing a sunrise or night photography. Tripods with spikes for feet are even better for outdoors. You can really push them into the earth for even better support. A tripod that can have its legs angled to 180 degrees lets the photographer shoot subjects that are near the ground. Otherwise bring a second table tripod for low shots. Monopods take up less space than tripods. To make them less wobbly try this tip from Outdoor and Survival skills for nature photographers by Ralph LaPlant and Amy Sharpe. Steady the monopod by placing it against the inside of your leg and knee and pushing it gently into the ground. If you’re driving and don’t feel like getting out of the car try a window mount. It’s a clamp for cameras that you place on a window. I’ve often thought about using one for various projects but I’m always paranoid that the camera is going to fall. Depending on where you’re going you should find out ahead of time if there are restrictions on how much and what type of camera supports you can bring with you. 4. Flash. You may think that when you’re shooting outside during the daytime you may never need to use a flash. On a beautiful still day you’re probably right. But the slightest breeze can cause a flower to tremble. Using a flash will help freeze the plant’s movements. 5. Book Guides. City dwellers who have an affinity for nature may be unaware of how close nature may be found. Book guides that cover subjects like bird watching and nature walks in nearby areas are a great resource. 6. GPS. Do I need to say more? 7. Lens cleaner. When you’re outside the wind will blow dust and particles onto your lens. A student asked me what my preference is when it comes to cleaning lenses. You have options such as a specially made non-abrasive cloth that costs under $2.00. There are brushes and pads and liquid cleaners to dab that pads with. If I absolutely have to I will use a dry cloth but my preferred way to clean my lens is with an air blower. I use a rubber one with a long red plastic tube at the end. It looks like toy rocket ship but it’s made for cameras and their lenses. I like it because its effective and won’t scratch or smear the lens. 8. Batteries. Always have extra. 9. Gloves. If it’s cold outside yes wear gloves. I know gloves can make handling a camera’s controls more cumbersome and you might think that handling the camera with gloves will result with lint on your lens. Use a shutter cable release or wireless remote to activate the shuutter without touching the camera. Or buy mittens with detachable finger holders so you can have more dexterity. There’s also another option of which I am apparently fond of this winter. Take your hands out of the gloves when handling the camera. After you take the shot blow on the cold fingers before sticking them back inside the glove and remind yourself why you’re out there. 10. Flashlight. After you’ve shot that beautiful sunset you may want a flashlight to guide you out of the forest or park (along with your GPS unit). Also, a flash can be used as another light source for shooting your image. There’s an eleventh tip. Don’t forget the golden rules of composition. (See article from an earlier post.) High Dynamic Range photography is a way of shooting images in order to capture the full range of luminance and tone available in a scene which is more than what a camera can capture with one exposure. The goal is to produce a print that approximates what the photographer saw. The human eye can see a much wider range of tones and luminance levels than a camera. High Dynamic Range photography works best with still objects but if you want people in your shot be sure that they are far enough from the camera to minimize motion blur. When would you use this technique? When the contrast between the tonal ranges is not gradual and therefore outside the limits of a graduated-neutral-density filter. The two pictures below are a great example of why you might decide to shoot using the High Dynamic Range technique. The structure below is a shelter in a park and it does its job admirably – keeping park- goers cool from summer heat. If you set your exposure, however, to approximate what inside the shelter looks like to your eyes the camera blows out the blue sky in the background as in the picture on the left. If you expose for the blue sky, inside the shelter becomes too dark as in the picture on the right.   In order to capture both the blue sky and the proper brightness of the shelter you have to shoot multiple exposures keeping the camera still so they can be combined more easily in Photoshop. The resulting image is below: 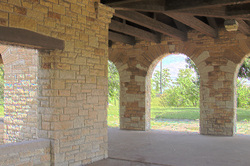 There are three parts to creating the third image you see above. First is shooting, second is using software to combine the images into an HDR image, and third is converting the HDR image to a low dynamic range image that can be viewed on computer monitors and printed in a way that preserves the luminance of the HDR image. Equipment List • Sturdy tripod • Camera that can be shot in manual mode • Camera with manual focus • (Optional) Camera with Exposure Bracketing • (Optional) Scanner to scan images into computer for those shooting with film. Otherwise, the place that develops the film may offer film to digital image conversion as a service Part 1 – Shooting for High Dynamic Range Imaging 1. Attach your camera to your tripod. 2. Set your lens to manually focus and select your plane of focus which should be the distance from your camera to the main subject. If there is a lot of open space in the scene and you’re not sure what you want your plane of focus (the part that is sharpest) to be, try 3 meters for interiors, infinity for outdoors. For a mixed setting similar to the shelter above you will have to play with the zoom until it feels and looks right to you. 3. Decide on your depth of field and select the appropriate aperture. 4. Keeping the aperture and ISO the same throughout this process meter the darkest and lightest areas of the scene and make a note of the recommended exposures indicated by your camera’s light meter. 5. Based on the stop difference between the darkest part and lightest part of the scene decide how many in-between exposures you will need to shoot. The stop difference (or Ev difference) between each shot should not be more than +/- 1 Ev. 6. Shoot. It doesn’t matter if you shoot from the slowest shutter speed to the fastest or vice versa. If you have exposure bracketing as a function in your camera take advantage of that feature. Be sure to program the exposure bracketing feature before shooting so that the two shots the camera takes after yours are at most +1 or -1 Ev from the original exposure you select. Also, since exposure bracketing only results in 3 images (1 of yours plus 2 the camera takes), remember that you will have to shoot at least one more set of exposures in order to have six images for the software to work with. You can use less than 6 exposures. For instance you could shoot one for the shadow area, one for the midtone, and one for the highlight resulting in 3 images; but the more exposures you shoot the better results you will obtain. Part 2 – Merging the images into a HDR Image. 7. After you’ve shot all your exposures download them into a folder on your computer. 8. Open up Photoshop, click on File | Automate | Merge to HDR. 9. Click on Browse and select the images you want Photoshop to merge into an HDR file. 10. If you used a tripod you should not have to select the option near the bottom of the dialogue box that prompts Photoshop to align the images. Selecting that option will add significant time to processing. Click okay. Photoshop uses your images’ metadata (information recorded by the camera about your image such as aperture setting, shutter speed, and ISO) in order to know the order in which to place the images before merging them. For images shot with a film camera metadata may not exist. Photoshop will prompt you to provide the Ev relationship between each image. Assign zero to the image that approximates the shot closest to what your eyes saw then assign a +/- Ev to the other exposures that’s relative to the one you selected as zero. 11. Photoshop will combine your images into a 32-bit HDR image. Before it’s done it will allow you to preview what will be the final image. At this point you can deselect and reselect as many of the exposures that you want and preview the changes. Once you decide which version you prefer click okay. 12. Save the HDR image in tiff format. Your HDR image may look a little dull at this point and that’s because you are looking at a High Dynamic Range image through a low dynamic range computer monitor. Printing it will probably result with the same problem for the same reason. Most printers people use can only capture well low dynamic range images. To get around this issue the image will have to be converted to a low dynamic range image that preserves the luminance and tone of the scene. Part 3 – Conversion of High Dynamic Range Image to Low (aka Standard) Dynamic Range image using Tone Mapping. 13. In Photoshop open your HDR image 14. Select Image | Mode | 8 bit 15. In the ensuing dialogue box select Local Adaptation as a method from the list option. This option is chosen when the goal is to render the image as a faithful reproduction of the scene. 16. Adjust the tonal curve if necessary 17. Click okay The picture of the shelter above used the Local Adaptation method to convert the image. Using this method in Photoshop may result in a pixelated image (as is seen above). Further editing with blur and noise reduction may have to be used to smooth out your images. The Local Adaptation method is preferred in terms of accuracy of tone and luminance. Photoshop has three other methods for conversion: Exposure and Gamma, Highlight Compression, and Equalize Histogram. Below are two images. The left photograph is an image of buildings and structures around the Chicago River shot to stand on its own. The scene was then reshot with the goal of creating an HDR image. The photo to the right is the HDR image converted to a standard or low dynamic range using the Exposure and Gamma method option of conversion in Photoshop. This option allows hyper-realistic images for artistic effect.   I’ve create a video for purchase that details the steps you go through to create a high dynamic range image from a set of exposures. It also shows how to convert an HDR image to a low dynamic range image fit for viewing on a monitor and printing using the Exposure and Gamma method. Screen shots cover the process step by step and include text describing the process. The video is provided on cd and is viewable with a Microsoft Media player. The Price for the video is $8.00. A private lesson on this topic is available as well.
For more info click here You may wonder why certain photographs appeal to you or to a large number of people. Research may lead you to discover that these photographs share certain design layouts that are referred to as composition rules. These rules have been used not only by photographers, but by painters and architects as far back as the ancient Greeks. During the Middle Ages artists made great use of these rules. Leonardo Da Vinci's Last Supper is one of many famous examples of the application of the rule called the Golden Mean. The Golden Mean (which will be discussed later in this article), like the design rules called the Golden Spiral and the Golden Triangle are based on a common ratio found in nature. The Golden Ratio (or phi) is 1 to 1.618. A popular example of this ratio is an acorn's spirals. The Golden Spiral and Golden Triangle are paths and subdivisions of a Golden Rectangle. A rectangle is said to be 'golden" if you are able to cut out a square that has a side length which in relation to the longer rectangle is 1 to 1.618, and you can infinitely repeat this proportion by removing a square from each resulting smaller rectangle. The Golden Rectangle drawn below left is comprised of seven golden rectangles. Only space and time prevented my drawing more. The middle image displays the golden spiral, and the third the golden triangle. For a triangle to be considered golden the length of its sides must display the following relationship 1 + phi = phi squared. Otherwise it's called a harmonious triangle. 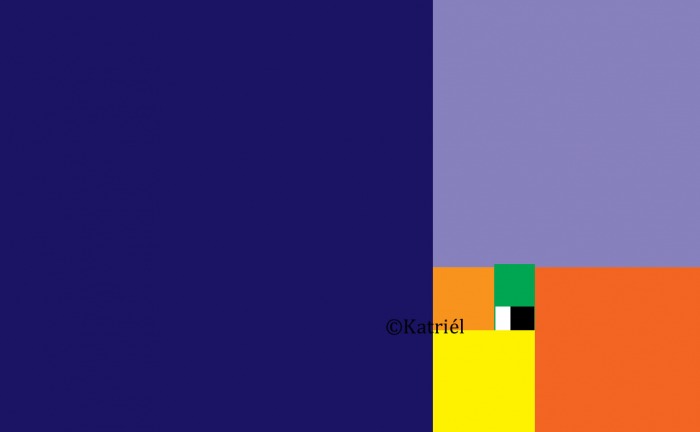 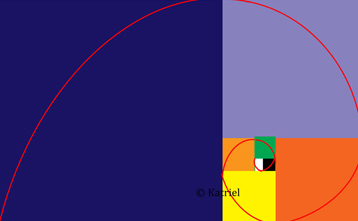 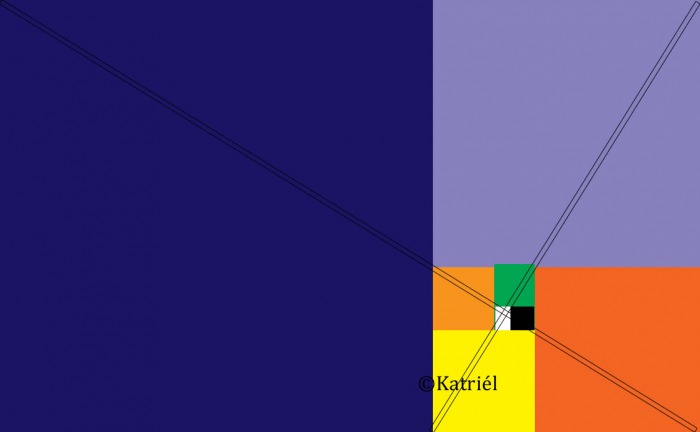 So how do you apply the Golden Rectangle aka Golden Section, Golden Spiral, and Golden Triangle when shooting? Well, the first thing to do is avoid deciding on a rule first then shooting. Elements in a scene may not lend themselves to certain rules. Let what you see through your viewfinder guide you and keep in mind your main subject. Certain subjects naturally lend themselves to the use of a particular rule. For instance, flowers in a field ... the spiral rule maybe? Pick a particular flower that stands out from the rest and try to place it toward a corner of what will be the photograph. Many flowers or bouquets are already spiral in shape. If you don't like shooting flowers another option might be pets. I've seen photographs of kittiens and dogs that have come out well by framing the animal's head using the spiral rule. Train tracks scream Golden Triangle. The triangle is a popular shape in photography in general. Start looking at your environment in terms of shapes. That may help you decide which composition rule to use. Another good one for triangles are trees. The following images shows photographs with the golden spiral and golden triangle superimposed. 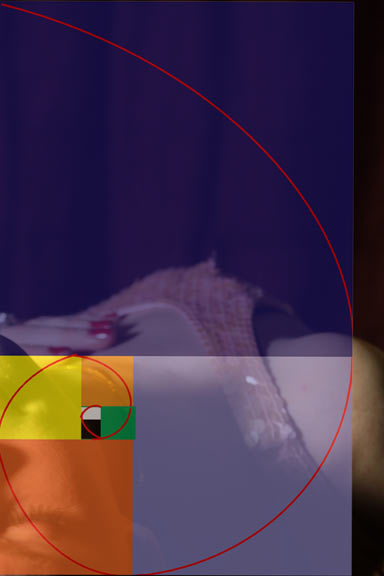 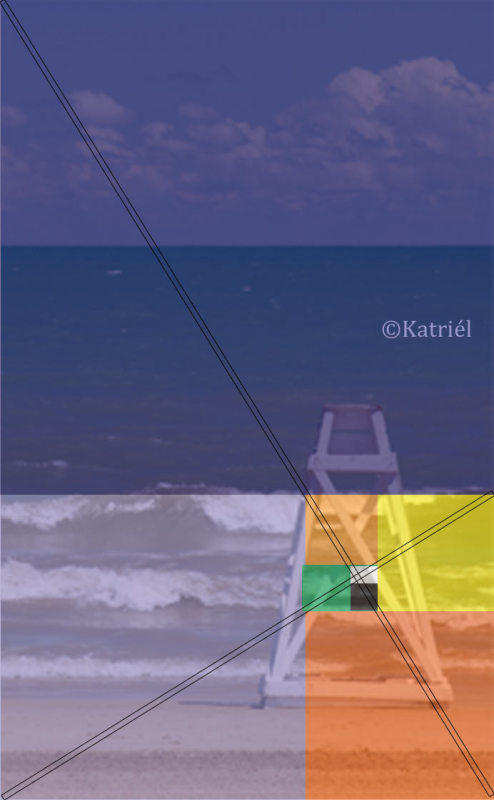 The above photographs align fairly well with the Golden Spiral and the Golden Triangle. Of the two figuring out where to place your subject using the Golden Triangle maybe a little more difficult. When you're out in the field it maybe easier to divide a scene into harmonious triangles. To construct a harmonious triangle determine which corner will have the focus of attention, bisect your scene by drawing one line in your mind from that corner to its opposite, then draw a line from an adjacent corner to a third of the edge closest to the focus of attention. The picture below makes use of the harmonious triangle. The line from bottom right to top left bisects the image. The line drawn to create the harmonious triangle begins from lower left and moves to the opposite side and intersects the right edge of the image a third of the way. 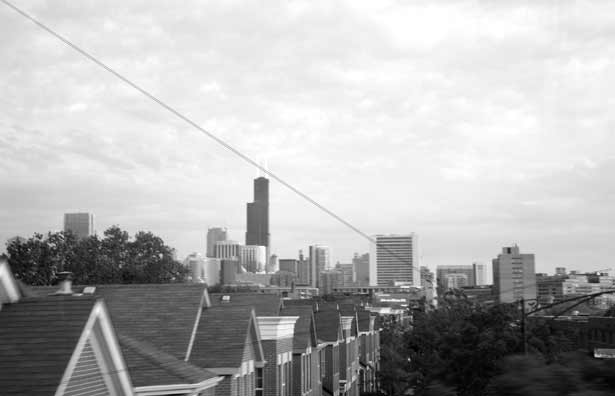 Speaking of thirds it's time to discuss the Rule of Thirds and the Golden Mean. The Rule of Thirds is a simplified version of the Golden Mean. To apply the Rule of Thirds, a photographer only needs to divide in his or her mind the scene s/he wishes to photograph in thirds horizontally and vertically with imaginary lines. The main subject is placed at the intersection of those lines Many digital cameras provide grid lines as an aide that mimic the Rule of Thirds. What's nice about the Rule of Thirds is it allows the photograph to show enough of a subject's background to offer context for your subject which can result in a more meaningful photograph. For the Golden Mean the horizontal lines must be 5/8 from the top, 5/8 from the bottom. The vertical lines must be 3/8 from the left edge and 3/8 from the right edge. These measurements come from the ancient Greeks. The first two illustrations below represent the Rule of Thirds and Golden Mean, respectively. The next row shows the illustration of the Golden Mean superimposed on an image of a bridge. The bridge is a perfect example of letting the subject guide your composition. My goal was to show the balance between the sky, the bridge, and the water. In this instance centering the bridge worked using the Golden Mean. Note that the edges of the bridge are near the intersections of the lines both above the water and in the reflection on the water's surface.  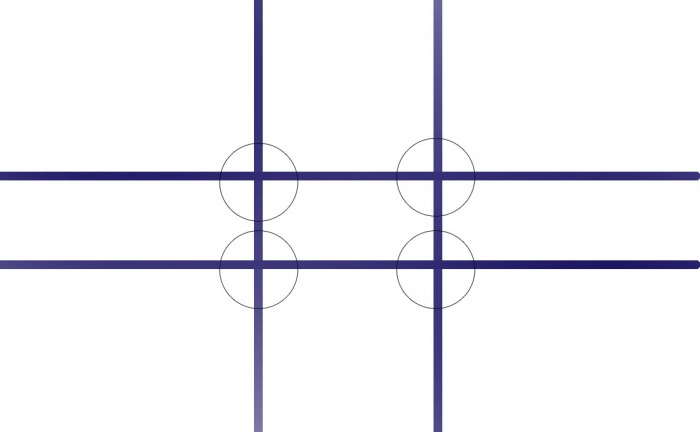 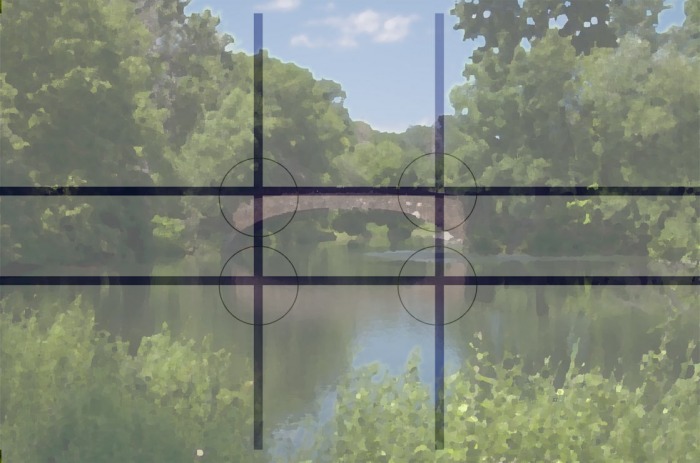 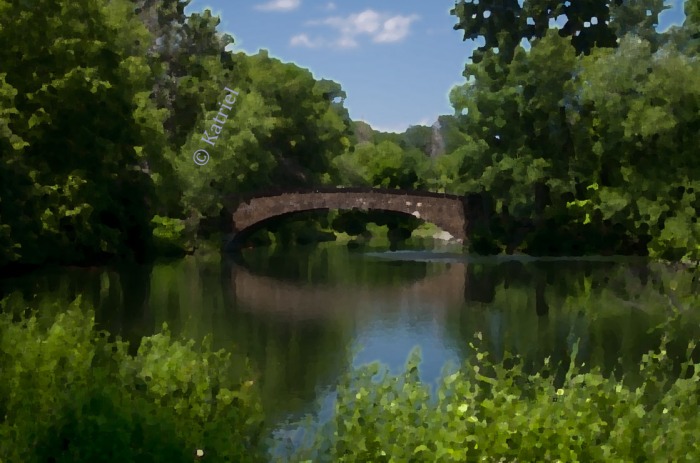 Though it's always better to create a well-composed photograph at the time of image capture conditions in the field may not allow for that at that moment. Sometimes you will need to use software to recompose the image and obtain a more aesthetically pleasing result. Before continuing you should know that a couple of the photographs used in this article were edited in Photoshop but the changes had to do with converting to black and white for the rooftop images, creating a digital image of the bridge with a little bit of cropping for this article. The model's image was cropped for compositional reasons without intentionally applying the golden spiral. And that's one of the things you may come to notice about your photographs: when you stop and search for a good composition your images may wind up becoming an unintentional example of a composition rule. The next two images of a lifeguard chair were shot as you see below and if memory serves me right I think all I did in Photoshop was straighten the offcenter one a little. The third image shows how well the second photograph sits within the Rule of Thirds. 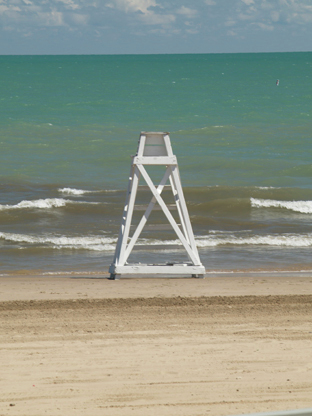 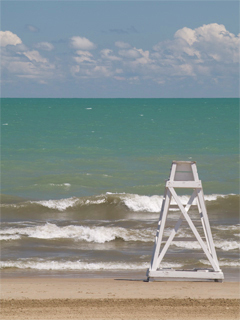 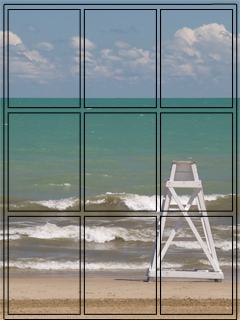 For the purposes of this article I wanted to see how the chair image might change if I cropped specifically using the golden rectangle composition rule. The image below left shows the lifeguard chair with the golden rectangle layered over it as a guide for cropping. The next image is the resulting photograph. Do you prefer the cropped image below or the one composed using the Rule of Thirds? 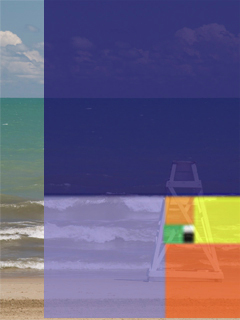 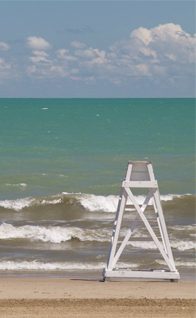 All content including photographs, images, and illustrations are copyrighted by Katriel. All rights reserved.
In part 1 of this article I discussed the use of second curtain flash in action photography especially when you want to include a trail of your moving subject. Sometimes, however, you may not be able to use second curtain flash when or how you would like to. In some cameras, that function is only available in certain shooting modes such as manual mode, or if you can use second curtain flash in automatic mode you may be restricted to a shutter speed of 1/60 of a second.. One sixtieth of a second maybe too fast to record the ambient light you want to capture. Check your camera’s owner’s manual to find out which shooting modes allow the use of second curtain flash sync and what other limitations may apply.
Another consideration for using second-curtain sync is the type of background you’re using and its tone in comparison to the moving subject. Your background should be as simple as possible. Avoid backgrounds that will compete with the trail. If that is not possible there are a couple of options that you can experiment with. You can darken the background rendering it less noticeable by using a faster shutter speed as long as it’s not faster than the sync speed (See part 1 for discussion of sync speed). If that negatively impacts the capture of the trail you may have better luck increasing the distance between the camera and the subject. This takes advantage of the inverse square law. The effect of inverse square law in photography is easier to see if you point the flash directly at an object. When you move the camera away from that object the effect of the flash is reduced by the inverse square of the change in distance. For example, if you placed a camera 3 feet from your subject then moved it to five feet the effective strength of the light would be 1/4 what it was before. Had you moved the camera from 3 feet to 6 feet, then the effect of the light would be 1/9th. For an interesting example of using second-curtain synchronization as a technique in action photography see this site. Second curtain use of camera flash – Part 1
By Katriel Knowing the difference between first and second curtain use of a flash in photography increases the options a photographer has when shooting action. Let’s take as an example a runner jogging at night. If the goal is to show the path of the jogger as s/he passed across the camera’s field of view you could just simply use a slow shutter speed, however, you would lose a lot of detail in the subject. By firing your flash on its default setting (assuming you’ve never made changes to the flash) with a slow shutter speed you could freeze the subject and still capture the ghostly trail. But what if you want the trail to appear on the opposite side? This is where second curtain sync comes in. So what is second-curtain sync or first -urtain sync? Digital SLR cameras use plane focal shutters to help control the length of time light strikes a sensor. For the most part the shutter consists of 2 sets of metal or cloth blades. These sets of blades create a blind between the sensor and the light coming through the lens’ aperture except for a slit of space between the blinds when they travel across the sensor. Each blind is called a curtain. When you press the shutter release button one of the curtains moves across the sensor exposing the sensor to light. There will come a point in time when the entire sensor is exposed to light before the 2nd curtain begins its travel if the photographer is using a shutter speed less than or equal to 1/60 of a second. (Many higher end cameras today can use what’s called –high sync speeds of 1/125 of second or faster .) A flash’s sync speed (or synchronization speed) is the fastest shutter speed a photographer can set which will leave the entire sensor completely open to light for a brief period. A flash needs to fire during the time the entire sensor is exposed to light; otherwise, you will see an image of the second curtain as it travels across the sensor. That part of your photograph will appear black. If you still use a film camera it will look like you did not advance the negative completely and as result only recorded part of the scene. The time lapse of a flash is much faster than the sync speed. Depending on the hardware a flash’s burst can be anywhere from 1/500 of second to over 1/4000 of second which is fast enough to freeze most moving subjects. In the world of photography then that leaves plenty of time for ambient light to also be recorded onto the sensor. When you use 1st curtain flash, ambient light is recorded after the flash burst. When you use 2nd curtain flash, the burst of light the flash fires occurs right before the 2nd curtain begins to move; obscuring light from the sensor. The ambient light is recorded prior to the burst of light. With slow shutter speeds moving subjects will be recorded blurry except at the point of the flash burst. This can lead to lead to some very interesting effects when shooting action such as having your shadow chase you or you chase your shadow (assuming you’re the subject of the picture). So what else do you need to know before taking shots using 2nd curtain synchronization? Plenty. Such as why using high-sync speeds may cause problems if trying to capture a motion trail. Also the shooting mode to which you’ve set your camera may prevent you from using 2nd curtain sync. Another consideration is the tone of your subject in comparison to the background and how much of the background or ambient light you actually want to record. You may want to record less ambient light than the shutter speed you set will produce. Knowing the inverse square law is helpful when you want to minimize ambient light. Part 2 will cover these issues. Which type of camera for which job: Do you have the right camera?
By Katriel Sometimes people ask me what’s the difference between a point-and-shoot and a SLR camera. Recently, someone wanted to know whether the zoom lens reflex camera they were considering for purchase could be used in a studio setting. Well, let’s break down cameras as to class, best use; and what does it really mean when a particular type of camera receives a “5 star” review. Point and Shoots. Compact, very portable, they often come with a wrist strap. These lightweight cameras are some of the least expensive cameras on the market. The lens that comes with this type of camera is permanently attached to the camera’s body, and many of these cameras do not offer the user too many options in terms of manual control. One of the reasons point-and-shoots are inexpensive is the quality of their lenses in comparison to other types of cameras. Because of the lower quality, these cameras are best for personal use and small prints up to 4” x 6”. Zoom Lens Cameras. They are fancier versions of point-and-shoots; their camera body size and architecture resemble SLR cameras, except for the permanently attached lens. The reach of the lens in terms of zoom is often deeper than the compact version. Most zoom lens cameras allow the user manual control over aperture, shutter speed, and focus unlike some compact point-and-shoots. What keeps zoom lens cameras from more professional consideration is the fact that the lens that comes with that type of camera is permanently attached to the camera body. Therefore, the camera is limited as to what it can shoot. Having the ability to swap lenses on a camera makes it easier to shoot the image you want. Also, though you can find expensive zoom lens cameras whose optics can rival the cheaper lenses of beginner-level SLR cameras, in general, most lenses of SLR cameras are constructed of a higher quality. A high-end zoom lens camera should be able to produce a sharp 11” x 17” print assuming the original image was of excellent quality to begin with. SLR Cameras. SLR stands for single lens reflex which is a technical term. For the purposes of this article what you need to know is a SLR or DSLR (the d is for digital) camera is a camera with a detachable lens which makes it very versatile and a favorite with professional photographers. SLR camera lenses comes in a variety of sizes from short to long, with different ranges as to field of view. The shorter the lens the wider is its field of view. Professional photographers who shoot architecture will have wide angle lenses as part of their camera kit in order to cover the expanse of a tall or broad building. Wildlife photographers often use long telephoto lenses that have narrower fields of view in order to focus on the subject while maintaining a distance that won’t spook the animal. The lens focal length, measured in millimeters, is an indication of how wide the angle of view is. Focal lengths 28 mm and shorter are preferred for architecture, 35 mm and shorter for landscape photography. 35 mm to 70 mm lengths are considered normal or standard and are used for documentary and street photography. 70 mm to 135 is medium telephoto and is used in portraiture. 135 mm and longer is considered telephoto and is used in nature and wildlife photography. The above information is based on a 35 mm film camera or digital camera with a full frame sensor. Some digital cameras use a smaller sensor which will affect the field of view recorded. Look up information on your particular camera to know how your camera’s sensor may affect your lens purchasing decisions. Medium Format Cameras. The original image size of a medium format camera is larger than point-and-shoots, zoom lens cameras, and SLRs. Most contemporary medium format cameras use film with a digital back as an option. The film used is larger than what you would find on a 35 mm camera and is recorded in centimeters. The proportions of the film are different as well. Many magazine photographers use medium format cameras for that reason. The proportions translate well to an 8 x10 magazine cover without too much enlarging or cropping. Medium format cameras can also be found in a portrait photographer’s camera bag due their ability to record detail at very high resolutions, but they are expensive, bulky, sometimes heavy, and do not have as many lens options as SLR cameras. Large Format Cameras. As the name implies, these cameras were created to produce clean large size prints. Their film size is recorded in inches instead of mm for the 35 mm camera, and centimeters for medium formats. They are very heavy, do not offer great depth of field, are not good at macro photography, and you will have to use the camera in manual mode. Photographers who work with large format cameras say the primary benefit in comparison to medium formats is the quality of the large size prints. It outperforms medium formats when it comes to large size black and white photography. So what does it mean when a point-and-shoot camera receives a 5 star rating? It means that it’s a good camera compared to others in its same class. The more expensive the camera the more money went into the quality of the optics. A top of the line point-and-shoot camera cannot compare to a top of the line single lens camera. When choosing a camera decide what you need the camera to do, and what is the largest print size you think you would want to print. If you can’t afford what you want right now it doesn’t mean that a camera that is less expensive cannot do the job. Read in-depth reviews on a particular camera and pay attention the limitations stated. If the limitations do not affect the type of photography you want to do then go for it or try and figure out a work-around. Gobos, Shadow and Light
How to Add Atmosphere to Your Images By Katriel There are few ways to add atmosphere to a photograph and my use of the word atmosphere refers to mood, mystery. This article discusses three. One way to accomplish this is to use gobos. In photography, you’ll find the word gobo used generously to mean anything that blocks or reduces light in a photo. Gobos are often used to create patterns or shapes projected into the photo. For instance, think of light streaming through the slats of window blinds. Imagine that rectangular pattern of shade and light projected onto a wall. If you decided to take a picture of an object such as a vase, included that rectangular pattern of light and shade created by the blinds but kept the actual blinds outside of the shot, the blinds would be serving as a gobo. Of course you don’t need actual window blinds to take that shot and that is what a real gobo is. Something you created or bought to place over a light source in order to make a certain effect part of your photograph. If you didn’t have window blinds or even a window you could buy a gobo specifically created to project that effect or make your own. And gobos come in all shapes and sizes. To make your own gobo get a piece of cardboard. (I found articles that suggest cereal boxes work nicely.) Cut it into the shape or pattern you want, then place it in front of your light source. You may have to do it a couple of times in order to get the size of the shapes right. Also, the strength of the lighting you use for the gobo may be different than what you want to use on your main subject. In that case, take the picture twice: once with the gobo pattern and once with the subject and merge the two in an image editing software such as Adobe Photoshop. The use of gobos is called subtractive lighting and is often used in low-key photography – another technique for adding atmosphere to a photograph. In low-key photography you shoot an image with minimal light such that the subject is partially in deep shadow and only certain features are exposed in detail. Common light modifiers used in low-key photography are soft boxes, snoots, dark backgrounds that absorb light, and flags. Don’t overlook the potential though of keeping things simple when it comes to low-key photography. Try using one dimmed light source and an interesting camera angle. The above are good techniques creating mystery or mood to a shot of a still life or portrait but what if you like landscapes. Ever wanted to shoot the fog rolling in but there was too much sunshine? You can buy a lens filter specifically created to add “fog” to an image. You can also smear petroleum jelly onto your lens, or add the fog effect afterwards using an image editing software that has that option. I prefer the lens filter option myself. It often looks more natural then adding the effect in post-production. And smearing your lens with gel to achieve the fog effect means cleaning the lens afterwards and very well. List of equipment you may need for techniques mentioned Gobos Snoots Fog filters Create a Photo Book
For Gifting, Display, or Selling By Katriel Whether you’re looking for a great gift or want to create a portfolio to show potential clients or publishers, a photo book can do both. The general steps to a photo book are what you might expect. 1. Collect 2. Design 3. Print As the expression goes the devil is in the details. Collect. Think of a theme that could run throughout your book such as Mom’s life story or My most highly rated online pics, or Wedding portfolio. What you decide will determine your selection of photographs. If your final selection includes printed pictures for which you don’t have a digital equivalent you will have to create a digital copy of those prints in order to send your images to a professional printer or your personal printer at home. To create a digital image of the prints copy the original photograph by shooting it with a digital camera or scan it with a scanner. If you use a digital camera make sure the original photograph is parallel to the camera and that it fills up the camera’s frame as much as possible before taking the shot. This will cut down on photo editing time. The last thing to “collect” is text. If your book will include stories and/ or captions go ahead and type it into your computer. Design. After you’ve completed the selection of photographs, typed the text that you want, and have stored them all on your computer you may think it’s time to design the layout out of your pages, but before you arrange your pictures into a page format you should figure out who is going to print it. Will it be a book printer, photo lab, or you using your personal printer at home? If you’re outsourcing try online vendors such as CafePress or Zazzle who are print-on-demand manufacturers and retailers who allow you to upload your designed pages to their website for printing. SmileBooks offer options such as design layout software that you can download and use; the company also offers design services done by professional graphic artists. Try also your local camera store and ask if they offer photo books creation services. If you’re creating a photo book as an avenue for income, consider hiring a professional graphic designer or ask your printer if they offer design and/or color correction services. After deciding who will print your pictures, use that company’s guidelines to arrange your pictures. The guidelines often include information such as margins for text and minimum quality settings for images. For you do-it-yourselfers, besides image editing software (which you can find for free on the Internet), you’ll need a personal home printer optimized for photography, a front and back cover for the book, paper and a way to bind the book. An online search will yield various options. I like entering the word review as part of any search I do, if the potential exists that I may purchase something. Input into an Internet search engine review photo book kit and see what you find. Print. You’re at the finishing line. You’ve collected, designed, uploaded your files to an online vendor or mailed them to a brick-and-mortar manufacturer. One last detail: Review a proof of your book before buying a copy to make sure everything is as you want it. That may not be possible with all online vendors but call to see if the company can send you a proof of the work via email if you don’t see that offered on their website. For the do-it-yourself person, print one copy of the pages on the printer that you plan on using for the book and carefully review each page. If all is well, continue and print as many copies as you want. List of equipment and software you may need to complete photo book graphic tablet digital camera image editing software paper printer photo book kit |